SQL SERVER ON LINUX WITH SQL BACKUP MASTER
SQL Backup Master fully supports backing up and restoring SQL Server databases that run on Linux. This article walks through a secure, production-ready configuration end to end – from the Samba share on the Linux host through the SQL Backup Master backup job and on through recovery.
SQL Backup Master itself runs on Windows, so this configuration uses an authenticated Samba share to give the Windows-side SQL Backup Master service a path it can write backup files to, while SQL Server on the Linux side reads and writes those same files locally.
What you'll set up
The completed configuration consists of:
- A dedicated, least-privilege Linux service account used only for Samba access from SQL Backup Master.
- A Samba share that's authenticated, encrypted in transit (SMB3), and reachable only from the SQL Backup Master Windows host.
- Linux directory permissions that allow both the Samba user (for writing backups) and the
mssqluser (for SQL Server to read them during restore) to access the same files. - A SQL Backup Master backup job pointed at the share, with the matching Linux-local path configured in the advanced settings.
Prerequisites
Before starting, you'll need:
- SQL Server running on a supported Linux distribution. Microsoft publishes installation guidance for SQL Server on Linux covering Ubuntu, RHEL, and SLES. The examples in this article use Ubuntu 22.04, but the same approach works on RHEL-family distributions with minor command differences (noted inline below).
- SQL Server's
saaccount password, or another SQL login that has sufficient permissions to back up and restore databases. - Administrative (
sudo) access on the Linux host. - SQL Backup Master installed on a Windows host that has network reachability to the Linux host.
Step 1: Install Samba on the Linux host
Samba is the SMB/CIFS server SQL Backup Master will use to write backup files to the Linux host.
On Ubuntu / Debian:
sudo apt-get update
sudo apt-get install -y samba samba-common-bin
On RHEL / Rocky / Alma:
sudo dnf install -y samba samba-common-tools
Step 2: Create the service account and backup directory
Create a dedicated Linux account that exists only for SQL Backup Master to authenticate to Samba. Give it no login shell – it never needs to log in interactively.
# create the dedicated service account
sudo useradd --system --shell /usr/sbin/nologin sbm-svc

# add it to the mssql group so SQL Server can read backup files during restore
sudo usermod -a -G mssql sbm-svc

# create the backup directory under SQL Server's data root
sudo mkdir -p /var/opt/sbm-backup
sudo chown sbm-svc:mssql /var/opt/sbm-backup

# setgid bit (2770) ensures new files inherit the mssql group
sudo chmod 2770 /var/opt/sbm-backup

# set the Samba password (separate from any Linux password)
sudo smbpasswd -a sbm-svc
The setgid bit and the mssql group membership are the two non-obvious steps.
Together they ensure that when SQL Backup Master writes a backup file to the share, the file ends up
owned by sbm-svc with group mssql – which is what allows the mssql user
(the user SQL Server runs as) to read it back during a restore. If you skip either step, backups will
appear to work but restores will fail with a permission-denied error from SQL Server.
Step 3: Configure the Samba share
Edit /etc/samba/smb.conf. In the [global] section, add or update these settings to require
SMB3 encryption and disable anonymous access:
[global]
    server min protocol = SMB3
    smb encrypt = required
    map to guest = never
    restrict anonymous = 2
    server signing = mandatory
    client signing = mandatory
Then add a new section at the end of the file for the SQL Backup Master share:
[sbm-backup]
    path = /var/opt/sbm-backup
    valid users = sbm-svc
    force user = sbm-svc
    force group = mssql
    create mask = 0660
    directory mask = 0770
    read only = no
    browseable = no
    guest ok = no
Verify the configuration is syntactically valid, then restart Samba:
sudo testparm -s
sudo systemctl restart smbd nmbd
sudo systemctl enable smbd nmbd
Step 4: Scope the firewall to the SQL Backup Master host
Restrict SMB traffic (TCP port 445) to the Windows host running SQL Backup Master. This is an important defense-in-depth measure: even with authentication and encryption, you don't want the share reachable from arbitrary hosts on the network.
On Ubuntu / Debian (ufw):
sudo ufw allow from <SBM_WINDOWS_HOST_IP> to any port 445 proto tcp comment 'sbm-svc'
On RHEL / Rocky / Alma (firewalld):
sudo firewall-cmd --permanent --zone=trusted --add-source=<SBM_WINDOWS_HOST_IP>/32
sudo firewall-cmd --permanent --zone=trusted --add-service=samba
sudo firewall-cmd --reload
If your environment doesn't use a host-level firewall on Linux (relying instead on a perimeter or cloud-provider firewall), you can skip this step – but make sure SMB exposure is restricted somewhere in the path.
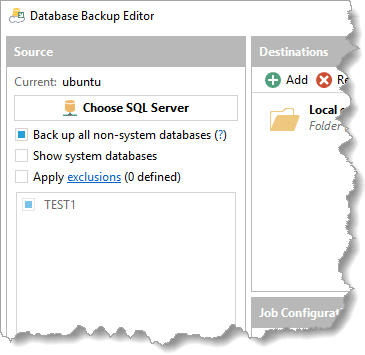
Step 5: Connect SQL Backup Master to SQL Server
Create a new database backup job in SQL Backup Master, then click the Choose SQL Server button in the backup job editor. The SQL Server connection dialog will appear.
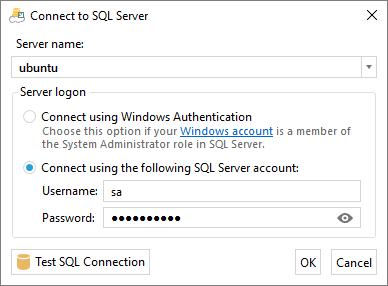
Enter your Linux host's name or IP address, and authenticate to SQL Server using the sa
username and password (or another SQL login with sufficient privileges). SQL Server on Linux does not
support Windows authentication out of the box, so SQL authentication is the practical choice. Click
Test to verify the connection, then OK to proceed.
You should now see the list of databases on the Linux SQL Server instance in the backup job editor. Select the databases you'd like to back up – or enable the All user databases option if you'd prefer backups to follow new databases automatically.
Step 6: Configure the backup temp folder
Click Backup Job Settings in the lower left of the backup editor.
In the Temporary backup folder field, enter the UNC path to the Samba share
you configured in Steps 1–4. For example, if your Linux host is 192.168.1.50,
the UNC path would be \\192.168.1.50\sbm-backup.

Click the Advanced button. The Advanced Temp Folder Configuration dialog will appear. Two settings here matter for the Linux scenario:
-
Alternate temp folder. Enter the Linux-local path to the same directory:
/var/opt/sbm-backup. SQL Backup Master uses this path when telling SQL Server where to write backup files – SQL Server on Linux needs a local path, not a UNC. -
Authentication credentials. Enter the
sbm-svcusername and the Samba password you set withsmbpasswdin Step 2. These are used to authenticate to the Samba share when SQL Backup Master writes through it from the Windows side.
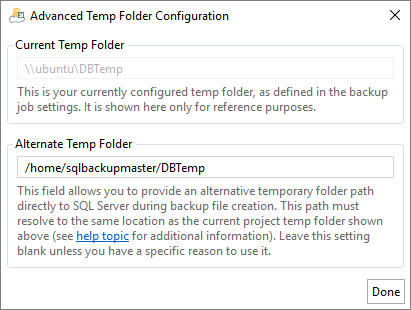
Click Save to close the Advanced Temp Folder Configuration dialog.
A note on temp folder permissions. Starting in v8.5, SQL Backup Master manages
NTFS permissions on its own temp folder when the default local path is in use. The Linux scenario
described above uses a UNC path with authentication credentials – SQL Backup Master detects this
and skips its built-in permission management entirely, since the share's ACLs are governed by the
Linux side (the Samba force user / force group directives in Step 3, plus
the directory permissions from Step 2). The
Backup Temp Folder Permissions article covers this
opt-out and the other configurations that bypass SBM-managed permissions; no action is required for
the Linux scenario.
Step 7: Add a backup destination
Finally, add a backup destination so SQL Backup Master knows where to store the final backup files. All destination types (network folder, Amazon S3, Azure Blob, Dropbox, Google Drive, OneDrive, and many others) are fully supported.
Save the backup job and click Run now to run it. The job log should report a host platform of "Linux" near the top, followed by a successful backup.
Restoring databases
Recovery uses the same alternate temp folder path you configured during backup, so no additional setup is required – SQL Backup Master will download the backup file to the share, and SQL Server on Linux will read it directly through the Linux-local path.
If you find that backups complete successfully but restores fail with a permission error from SQL Server, the cause is almost always the directory permissions described in Step 2. Specifically, double-check that:
- The
sbm-svcuser is a member of themssqlgroup:id sbm-svcshould listmssqlin its groups. - The backup directory has the setgid bit set:
ls -ld /var/opt/sbm-backupshould showdrwxrws---(thesin the group section is the setgid bit). - Backup files in the directory have group
mssqlwith read access:ls -l /var/opt/sbm-backupshould show files ownedsbm-svc:mssqlwith mode-rw-rw----.
Troubleshooting
"SQL Server can't read the backup file" during restore. The mssql user can't access the file. Check the three conditions above in the "Restoring databases" section.
"Connection refused" or "No connection could be made" from SQL Backup Master. Either Samba isn't running, the firewall is blocking the SQL Backup Master Windows host, or the Linux host is on a network the Windows host can't reach. Verify with PowerShell on the Windows host:
Test-NetConnection -ComputerName <linux-host> -Port 445
If that fails, work outward: check sudo systemctl status smbd on Linux, then the firewall, then routing/DNS between the two hosts.
"Authentication failure" or "Logon failure" when connecting to the share. The Samba password is separate from any Linux password the same account might have. Make sure you ran smbpasswd -a sbm-svc in Step 2 and entered the same password in the Advanced Temp Folder Configuration dialog. To reset the Samba password, re-run sudo smbpasswd sbm-svc on the Linux host.
Older SMB protocol issues. The hardened configuration requires SMB3. Very old Windows clients (Windows 7 / Server 2008 R2 without updates) may not negotiate SMB3. SQL Backup Master runs on Windows 10 / Server 2016 and later, so this rarely matters in practice – but if you're testing connectivity from an older client, that's the cause.
Security notes
The configuration in this article protects against:
- Network eavesdropping on backup file contents (SMB3 encryption in transit).
- Anonymous or unauthenticated access to the share.
- Access from arbitrary hosts on the network (firewall scoping to the SQL Backup Master Windows host).
- Privilege escalation through the Samba service account – the
sbm-svcaccount has no login shell and no home directory of consequence.
The configuration does not protect against:
- A compromised SQL Backup Master Windows host. The Windows host stores the Samba credentials and has full read/write access to backup files.
- An attacker with shell access to the Linux host. The
mssqluser can read backup files, and root can read anything. - At-rest disclosure of backup file contents on the Linux filesystem. If your databases contain sensitive data, configure backup encryption in SQL Backup Master and/or at-rest encryption (LUKS) on the Linux backup directory.