BACK UP SQL SERVER TO A NETWORK FOLDER OR NAS
A file server, NAS device (Synology, QNAP, etc.), or even a secondary local drive is often the first line of defense in a backup strategy – fast to write to and fast to restore from. This tutorial walks through backing up SQL Server databases to a local or network folder with SQL Backup Master, including the credential and service-account details that network destinations commonly trip over.
Prerequisites
- A backup target: a local folder, an external drive, or a network share reachable from the SQL Backup Master host (e.g. \\server\backups).
- SQL Backup Master installed on a Windows host that can reach your SQL Server instance.
- A SQL Server login (or Windows account) with permission to back up your databases.
- For secured network shares: a username and password with write access to the share.
Step 1: Create a backup job
In SQL Backup Master, create a new database backup job. The Database Backup Editor window will open – give the job a descriptive name so it's easy to identify later.
Step 2: Connect to SQL Server
Click Choose SQL Server in the backup job editor. The SQL Server connection dialog will appear. Enter your SQL Server instance name in the Server Name field. Common formats include:
(local)\SQLExpress – local SQL Server Express instance
(local) – local SQL Server default instance
Server1\SQLExpress – remote SQL Server Express instance
Server1 – remote default instance
Click Test SQL Connection to verify connectivity before proceeding, then OK.
Step 3: Select databases
The backup job editor now lists the databases available on your SQL Server instance. Check the databases you'd like to back up. To automatically include databases created in the future, enable the option to back up all non-system databases.
Step 4: Add the folder destination
Under Destinations, click Add, then double-click Local or Network Folder in the destination list.
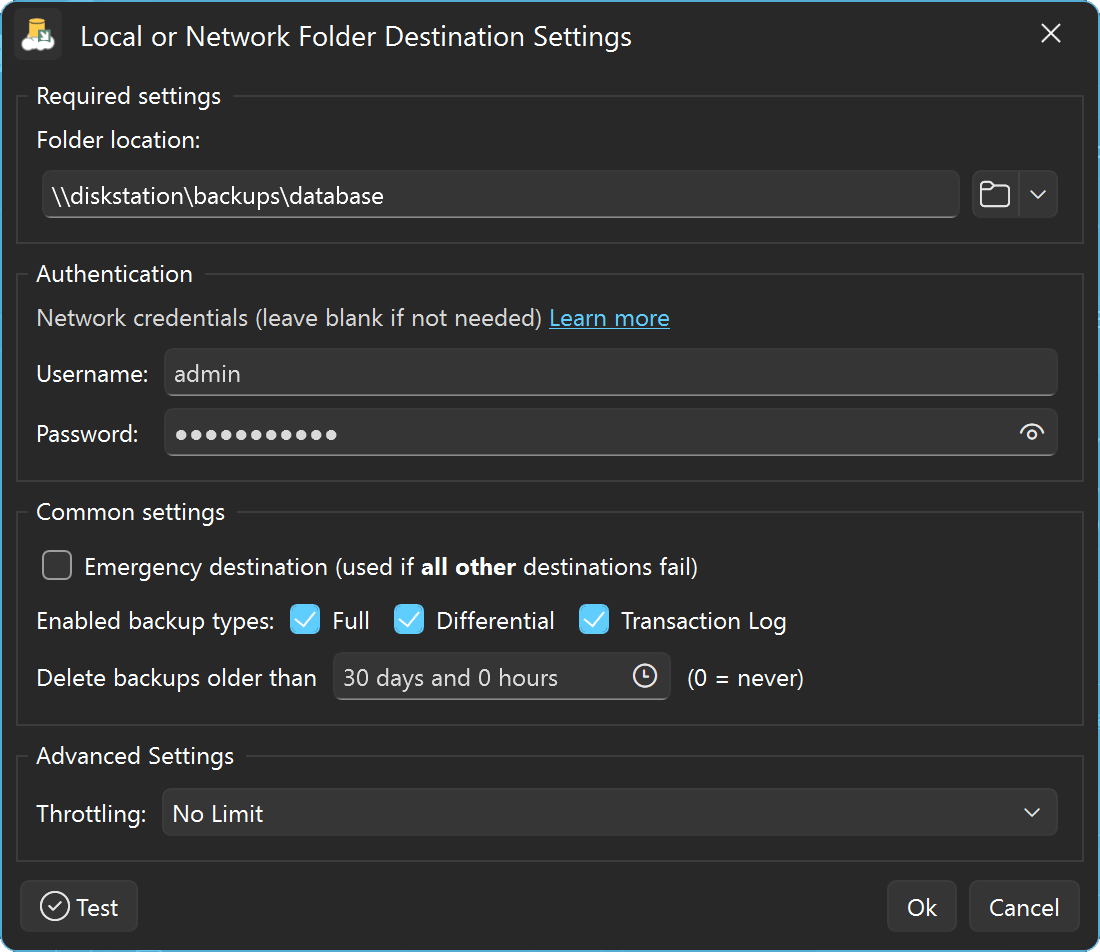
In the Folder location field, browse to (or type) the target folder path:
- Local folder – e.g. D:\SQL Backups. The folder is created automatically if it doesn't exist.
- Network share or NAS – use the UNC path, e.g. \\server\backups. Avoid mapped drive letters – the SQL Backup Master service runs in its own session where mapped drives typically don't exist, so UNC paths are far more reliable (the app will suggest the UNC equivalent if you enter a mapped drive).
If the share requires authentication, enter the username and password in the Authentication section. For NAS devices, the username often needs the device name as a prefix (e.g. diskstation\admin). Leave the fields blank for local paths and shares that allow open access. When credentials are supplied here, you should also configure the backup job to run under a specific Windows account – see the Windows account help topic for why this matters.
Click Test to verify that SQL Backup Master can write to the folder, then OK to save the destination.
Step 5: Schedule and settings
Configure a recurring schedule in the backup job editor if you'd like unattended backups. The destination's Delete backups older than setting is worth a look here too – it automatically prunes old backup files so the target disk doesn't fill up.
Step 6: Run and verify the backup
Save the backup job and return to the main window. Select the job and click Back up now. When the job completes, review the job log to confirm each database backed up successfully, then open the target folder to confirm the backup files arrived. If the job fails with an access error, the culprit is almost always credentials – re-check the authentication fields and the job's Windows account configuration.