
BACK UP SQL SERVER TO MINIO
MinIO is the de facto standard for self-hosted, S3-compatible object storage – ideal when your backups need to stay on infrastructure you own, whether for data-sovereignty rules, air-gapped environments, or simply avoiding recurring cloud costs. SQL Backup Master ships with a dedicated MinIO destination template; this tutorial covers the MinIO-specific setup. It also serves as a good reference for connecting SQL Backup Master to any self-hosted S3-compatible system via the Custom (S3) destination.
Step 1: Create a bucket
Open the MinIO Console (by default at port 9001 on your MinIO host) and create a bucket for your database backups, e.g. sql-backups. The bucket must exist before configuring SQL Backup Master – the application will not create it for you. For backup data, consider enabling versioning on the bucket so accidental deletions are recoverable.
Step 2: Create access keys
In the MinIO Console, open Access Keys and create a new key pair. Record the access key and secret key when they're shown. Avoid using the MinIO root credentials for backups – a dedicated key (optionally restricted with a policy to just the backup bucket) is safer and can be rotated independently.
Step 3: Note your server endpoint
SQL Backup Master connects to MinIO's S3 API port – port 9000 by default, not the console port – e.g. https://minio.example.com:9000.
A note on TLS: if your MinIO server uses a certificate issued by an internal certificate authority, make sure that CA is trusted by the Windows host running SQL Backup Master (SQL Backup Master validates certificates against the Windows certificate store). For a server without TLS on a trusted internal network, you can specify http:// explicitly in the service address – though TLS is recommended wherever practical, since database backups are sensitive data.
Step 4: Create the backup job
In SQL Backup Master, create a new backup job, connect to your SQL Server instance, and select the databases to protect. These steps are common to all destinations and are covered in detail in our Amazon S3 tutorial (Steps 3–5) – the process is identical here.
Step 5: Add the MinIO destination
In the Destinations section, click Add and double-click MinIO (S3). In the destination settings window, enter:
- Access key and Secret key – from Step 2.
- Bucket – the bucket you created in Step 1.
- Service address – your server endpoint from Step 3, including the port.
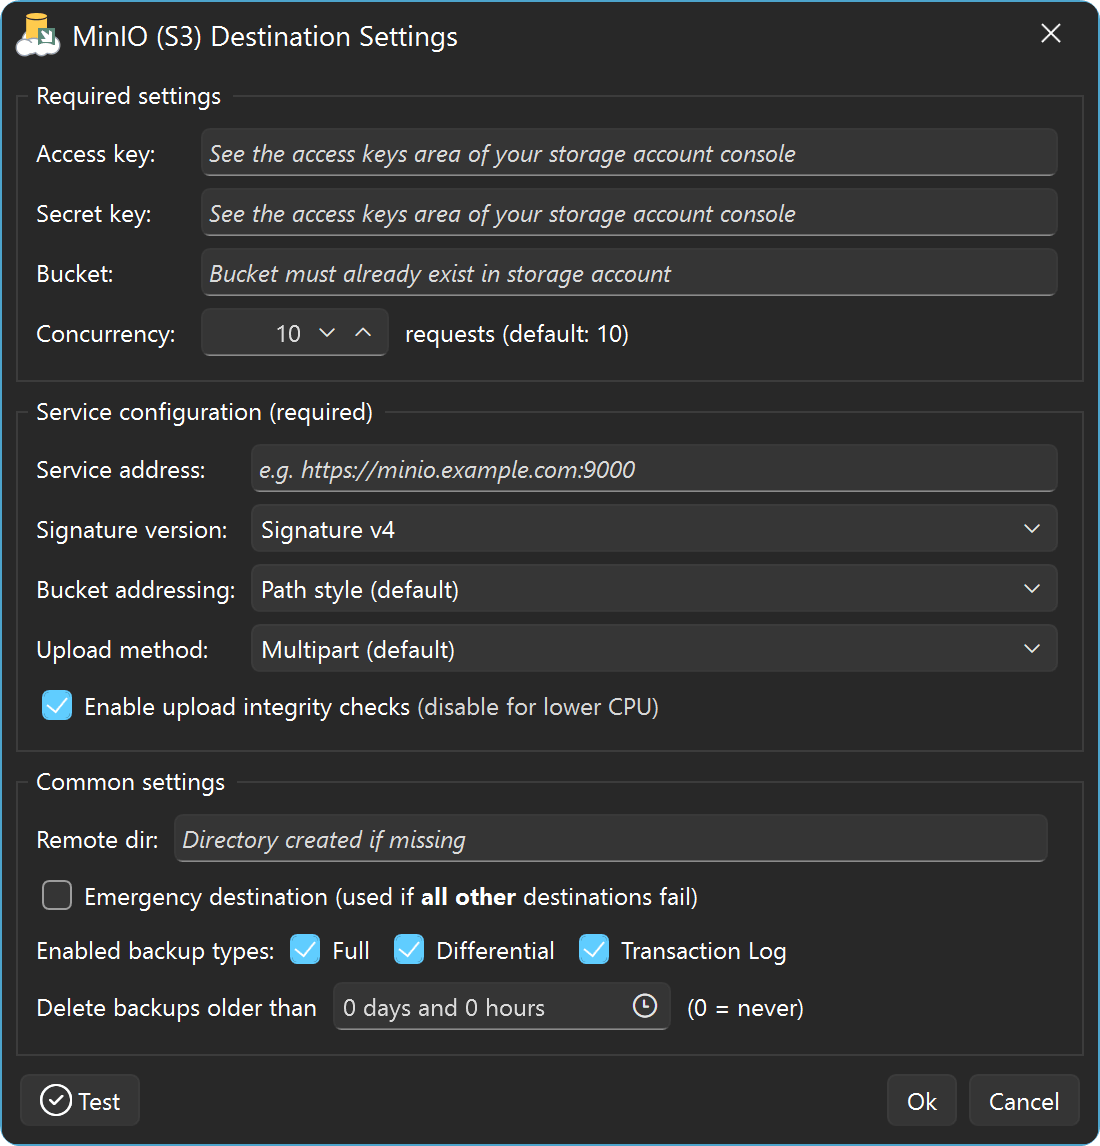
The template pre-configures the remaining options for MinIO: Signature v4 and path-style bucket addressing, which self-hosted deployments require unless you've specifically set up wildcard DNS for virtual-hosted-style access. Leave the upload method on Multipart. Click Test to verify the connection, then OK, and save the backup job.
Step 6: Schedule, run, and verify
Configure a recurring schedule if you'd like unattended backups, then run the job with Back up now. When it completes, review the job log and confirm the backup files appear in the bucket via the MinIO Console. One caution for on-premises setups: if your MinIO server lives in the same building as your SQL Server, you have redundancy but not disaster protection – consider pairing this destination with an off-site one (SQL Backup Master supports multiple destinations per backup job).
Related resources
- Visual tour: backing up SQL Server to MinIO
- Custom S3 Compatible destination help – reference for all settings in the MinIO destination window.
- S3-compatible services overview