
BACK UP SQL SERVER TO ONEDRIVE FOR BUSINESS
If your organization already subscribes to Microsoft 365, the OneDrive for Business storage that comes with it is a convenient, no-extra-cost home for off-site SQL Server backups. This tutorial walks through connecting SQL Backup Master to a work or school Microsoft account and running your first backup.
Prerequisites
- A Microsoft work or school (Microsoft Entra) account with OneDrive for Business access. Backups are uploaded to this user's own OneDrive drive, so consider using a dedicated service or admin account rather than a personal employee account.
- SQL Backup Master installed on a Windows host that can reach your SQL Server instance.
- A SQL Server login (or Windows account) with permission to back up your databases.
Note that this destination is for work and school accounts only. If you have a personal Microsoft account, use the standard OneDrive destination instead – see the OneDrive backup tutorial.
Step 1: Create a backup job and connect to SQL Server
In SQL Backup Master, open the backup management area and select New Backup. In the Database Backup Editor window, click Choose SQL Server to open the connection dialog, then enter the SQL Server instance name in the Server name field. Common examples include:
- (local)\SQLExpress – Default SQL Express named instance on your local computer
- (local) – Local SQL Server installation without an instance name
- Server1\SQLExpress – Default SQL Express named instance on a remote computer called "Server1"
- Server1 – Unnamed SQL Server instance on a remote computer called "Server1"
Tip: Use the dropdown arrow in the Server name field to discover local and remote SQL Server instances automatically.
Click Test SQL Connection to verify the connection, then select OK.
Step 2: Select the databases to back up
The Database Backup Editor displays available databases in the Source column. Check the database(s) you'd like to include in this backup job. Enabling Back up all non-system databases automatically includes newly created databases going forward.
Step 3: Add a OneDrive for Business backup destination
Under the Destinations header, click Add to view the available backup destinations. Double-click OneDrive for Business to proceed.
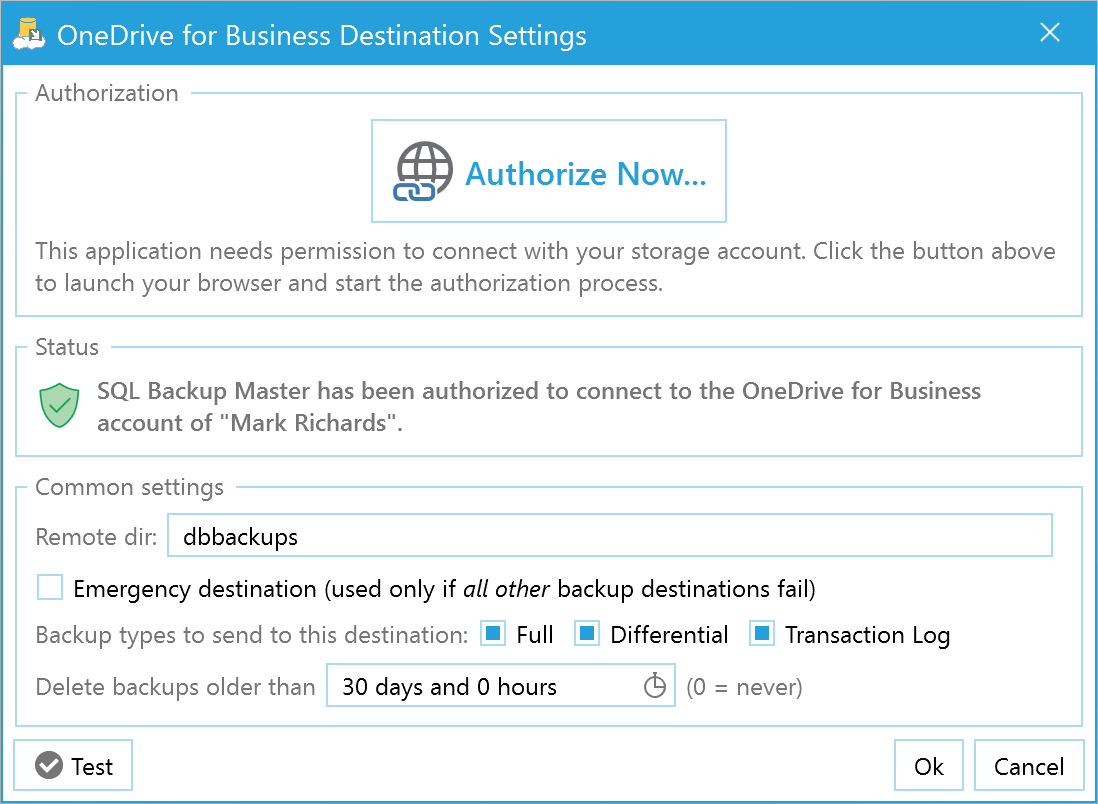
In the destination settings window, click Authorize Now. Your default browser opens to a Microsoft sign-in page – sign in with your work or school account and accept the requested permissions. You'll then be shown an authorization code: copy it, return to SQL Backup Master, paste it into the Authorization Code window, and click OK. The settings window will confirm the connected account name.
Optionally, set Remote dir to a folder name (e.g. "SQL Backups") – the folder is created automatically if it doesn't exist. Use the Test button to confirm the connection, then select OK and save the backup job using the save icon in the Database Backup Editor.
Step 4: Schedule the backup job (optional)
SQL Backup Master can run backup jobs automatically on a recurring schedule, keeping your OneDrive for Business backups current without manual intervention. Configure a schedule from within the backup job editor, choosing a recurrence that matches how frequently your data changes.
Step 5: Run the backup job and verify
Select your newly created backup job in the main application window and click Back up now. When the job completes, review the job log to confirm success, and open OneDrive in your browser to see the uploaded backup files. If any issues occur, the job log contains detailed error information.