SQL SERVER FOR LINUX AND SQL BACKUP MASTER
Tens of thousands of companies around the world rely on SQL Backup Master to back up their mission-critical SQL Server databases. Historically, those SQL Server installations always ran on Windows. One of the more interesting features of SQL Server 2017, however, is that it now runs on Linux as well.
In this article, we’ll discuss how to use SQL Backup Master (running on Windows) to back up SQL Server databases hosted on Linux.
Installing SQL Server on Linux
If you’re new to the idea of running SQL Server on Linux, you’ll be pleased to learn that Microsoft offers excellent startup guidance as well as an informative SQL Server on Linux FAQ.
For our tests, we chose to install SQL Server 2017 on Ubuntu 16.04 – but the configuration concepts should be nearly identical for the other supported Linux variants. The remainder of this article will assume that you have SQL Server up and running on a supported Linux operating system. You should also have at least one database present (create an empty database for testing purposes, if needed).
Installing Samba
Next, you’ll need to install Samba on Linux. Doing so will provide SQL Backup Master with the Linux file system access that it requires.
Since we're running Ubuntu, we used the Install and Configure Samba guidance published on the Ubuntu website. If you’re running a different Linux variant, then we recommend searching for installation instructions specific to your platform.
Configuring Samba
With Samba up and running, the next step is to create a share on the Linux host that is fully accessible to the Windows host that’s running SQL Backup Master.
For the purposes of this article, we’re going to keep the Samba share configuration simple. We named our Ubuntu host machine "ubuntu" and created a user account named "sqlbackupmaster". Next, we created a folder named "DBTemp" below the "sqlbackupmaster" user’s home directory and shared it using the following Samba configuration block:
                                            [DBTemp]
                                            path = /home/sqlbackupmaster/DBTemp
                                            available = yes
                                            read only = no
                                            browsable = yes
                                            public = yes
                                            writable = yes
                                            guest ok = yes
In the global Samba configuration block, our sample configuration is as follows:
                                            [global]
                                            workgroup = [DOMAIN]
                                            netbios name = ubuntu
                                            security = user
                                            guest account = sqlbackupmaster
The above configuration uses a very simple security model. Any unauthenticated (e.g. "guest") user accessing the "DBTemp" share is assumed to the "sqlbackupmaster" user. This is done in order to provide SQL Backup Master with full access to the directory represented by the "DBTemp" share without needing to authenticate. This model may or may not be appropriate for your organization’s security requirements, so again – consider this an example configuration and feel free to tweak the security configuration as you see fit.
We also recommend that you chmod g+s your temp backup folder to ensure that any backup files placed within it inherit its permissions.
Now we restart Samba on the Linux host ("sudo service smdb restart") so that our configuration changes are enacted. At this point, you should be able to connect to the "ubuntu\DBTemp" share from Windows.
Configuring SQL Backup Master
The final step of this process involves configuring SQL Backup Master to create database backups using the components we installed and configured above.
Start by creating a new database backup job in SQL Backup Master, then click the Choose SQL Server button in the database backup editor. The SQL Server database connection dialog will appear.
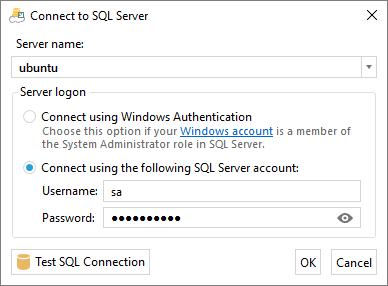
As you can see in the screen shot above, we’re connecting to our SQL Server host machine (named "ubuntu") and authenticating to SQL Server using the "sa" username and password. Use the test button to make sure the connection is working and then click OK to proceed.
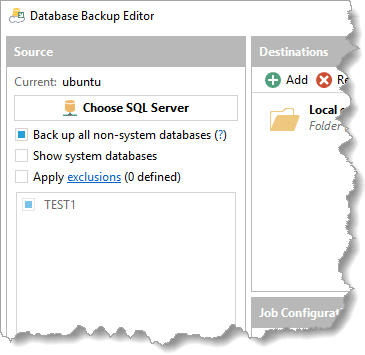
Now you should see a list of databases in the backup job editor. As you can see below, we created a single test database named "TEST1" on our SQL Server installation. We also selected the Back up all non-system databases option, just in case we decide to add more databases in the future.
Next, we need to configure SQL Backup Master to use the "DBTemp" share that we created earlier. To start, click the Backup Job Settings link in the lower left corner of the backup editor window. In the Temporary backup folder field, enter the full path to our share, as shown below:

Now since our SQL Server instance is running on Linux, we need to take an additional step. Click the Advanced button shown in the screen shot above. The Advanced Temp Folder Configuration window will appear. Here we want to specify a fully qualified local path to our "DBTemp" folder, as shown below:
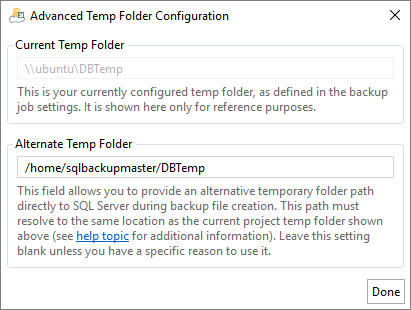
This step ensures that Windows and Samba both know how to access the temp folder and is only necessary when hosting SQL Server on Linux.
The final step for our test scenario is to add a backup destination. This will tell SQL Backup Master where to store the final database backups and, in our case, we’re just going to use a local folder for demonstration purposes. But all backup destination types (network folder, Dropbox, Google Drive, etc.) are fully supported.
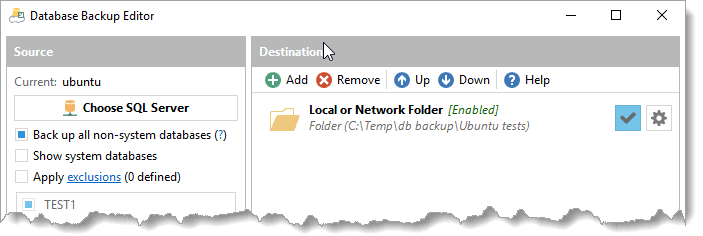
That’s it. Now we can save our backup job configuration and test it out by clicking the Back up now button next to our next backup job.
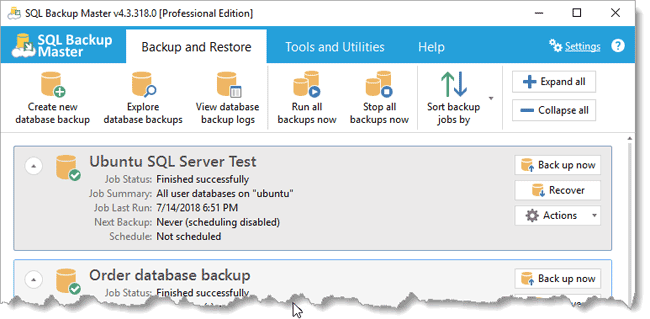
As you can see above, the backup completed successfully.

