“Invalid backup chain detected” Troubleshooting
SQL Backup Master 6.3 includes a new feature called backup chain validation that is responsible for generating “invalid backup chain detected” messages. This article describes the goal and function of this feature.
Introduction
The goal of backup chain validation is to warn users when other third-party applications could potentially interfere with the SQL Server backup chain. Specifically, when a differential or transaction log backup is started, SQL Backup Master analyzes SQL Server’s backup history table and checks to see if the most recent backup was also created by SQL Backup Master.
If a possible conflict is detected, SQL Backup Master writes an “invalid backup chain detected” message to the log. Such messages can be logged as warnings (default) or errors, depending on backup job settings.
Note that copy-only database backups are ignored during backup chain validation, as they don’t interfere with the SQL Server backup chain. See below for details.
Why does it matter?
Why is it a potential problem if another software tool is also taking SQL Server backups?
In some cases, it won’t be. If a third-party software tool is taking copy-only SQL Server backups, those will not interfere with the backup chain so SQL Backup Master won’t warn about them. If you need to occasionally take a backup outside of SQL Backup Master (i.e. via SQL Server Management Studio, etc.) then creating a copy-only backup is a good option.
However, some third-party products will create snapshot backups (via Volume Shadow Copy Service) that will invalidate the backup chain. A broken backup chain can then trigger other backup errors or interfere with future restore efforts.
Troubleshooting
SQL Backup Master makes it easy to see if another software tool is taking snapshot database backups.
To start, select the Reporting tab in the main product window and select the Backup history report. Starting at around the time when SQL Backup Master logged the “invalid backup chain detected” message, look for preceding report entries with the Is Snapshot field set to True.
You can also look for report entries with a Backup set field that is not set to “SQL Backup Master backup”.
Solutions
If you’ve used the information above to determine that snapshot database backups are triggering this message, there are several possible solutions.
One option is to disable the SQL Writer system service, which VSS (Volume Shadow Copy Service) uses to create SQL Server database snapshots. To do so, Run services.msc, find the SQL Server VSS Writer service, stop it, and configure it to start up manually.
Another possible option is to determine which third-party backup solution is taking SQL Server database snapshots and configure it not to do so. For example, if you’re using Azure Backup you may wish to avoid using the SQL Server backup agent. Other Virtual Machine or cloud-based solutions may have backup features that can be similarly configured.
Finally, if you determine that the “invalid backup chain detected” messages logged by SQL Backup Master are not relevant for your environment, you can ignore them (if they’re configuring as warnings) or disable them entirely in the Database tab of the backup job settings window.
Once the problem is resolved, we recommend taking a manual full backup of any affected databases in SQL Backup Master to reset the backup chain.
Extended S3 Support in SQL Backup Master 6.3
SQL Backup Master v6.3 has arrived, and extends our (already excellent) S3 support by adding explicit support for IDrive e2 and a Custom S3-Compatible backup destination.
The new custom S3 backup destination makes it easier than ever to target a wide range of S3-compatible services and devices – including on-premises storage systems such as:
- MinIO – A high-performance, S3 compatible object store built for large scale AI/ML, data lake and database workloads.
- Cloudian Hyperstore – An S3-compatible object storage platform designed to manage limitless amounts of data in a cloud-native data format.
- Ceph – A unified storage service with object, block, and file interfaces from a single cluster built from commodity hardware components.
- LeoFS – An open source distributed object storage system and a highly available, distributed, eventually consistent storage system.
- Riak S2 – An easy-to-operate, readily available, and highly scalable storage software optimized to store objects.
This new release also exposes additional service endpoints for Wasabi backup destinations, offers improved support for Azure blob service versions, and more.
SQL Backup Master v6.3 is available for immediate download.
Authenticate to S3 using an EC2 IAM Role
With the release of SQL Backup Master v6.1.586.0, you can now authenticate your Amazon S3 backups directly via an IAM role assigned to an EC2 instance. This approach eliminates the need to store or input S3 credentials in SQL Backup Master—helping to streamline security and simplify setup.
Instead of entering your access key and secret key, SQL Backup Master will automatically use the EC2 IAM role to access your S3 bucket(s). Below is a quick guide on configuring both your EC2 environment and SQL Backup Master.
CONFIGURING THE EC2 ENVIRONMENT
1. Create an IAM role within the AWS IAM console. 2. Attach the AmazonS3FullAccess permission (or a policy granting the necessary S3 access) to this IAM role. 3. Assign the new role to the EC2 instance where SQL Backup Master is installed.
For detailed steps on creating and attaching IAM roles to EC2 instances, refer to the official AWS documentation: https://docs.aws.amazon.com/IAM/latest/UserGuide/id_roles_use_switch-role-ec2.html
CONFIGURING SQL BACKUP MASTER
1. Install or upgrade to SQL Backup Master v6.1.586.0 (or later) on the EC2 instance. 2. Open or create a database backup job that uses Amazon S3 as the destination. 3. Select Authenticate using EC2 IAM role instead of entering an access key and secret key. Leave those fields blank.
Finally, run your backup job to ensure everything is working correctly. SQL Backup Master will automatically leverage your EC2 IAM role for the necessary permissions to upload backups to S3.
That’s it! By using an EC2 IAM role, you streamline your S3 backup process while adhering to AWS security best practices—eliminating the need to store or rotate AWS credentials within SQL Backup Master.
SQL Backup Master 6 is Available
Key Metric Software has released SQL Backup Master 6 – a new major version of our SQL Server database backup tool.
New features include backup reporting (with optional scheduling and email delivery), webhook notifications, support for SQL Server 2022, and much more.
For a visual overview of what’s new, please see:
https://www.sqlbackupmaster.com/features/whatsnew
Download the new SQL Backup Master v6 release here:
Back Up SQL Databases to OneDrive
Looking to quickly back up SQL to OneDrive? With SQL Backup Master, you can effortlessly protect your SQL Server databases by storing them in Microsoft’s secure OneDrive cloud. Follow the steps below to set up, authorize, and run your backups in just a few minutes.
STEP 1 – ONEDRIVE ACCOUNT CREATION AND SETUP
To create a OneDrive account, navigate to Microsoft OneDrive’s homepage. Select the Sign In button and input your Microsoft account details. After verifying your credentials, you’ll be taken to OneDrive.
STEP 2 – CONNECT TO YOUR SQL SERVER
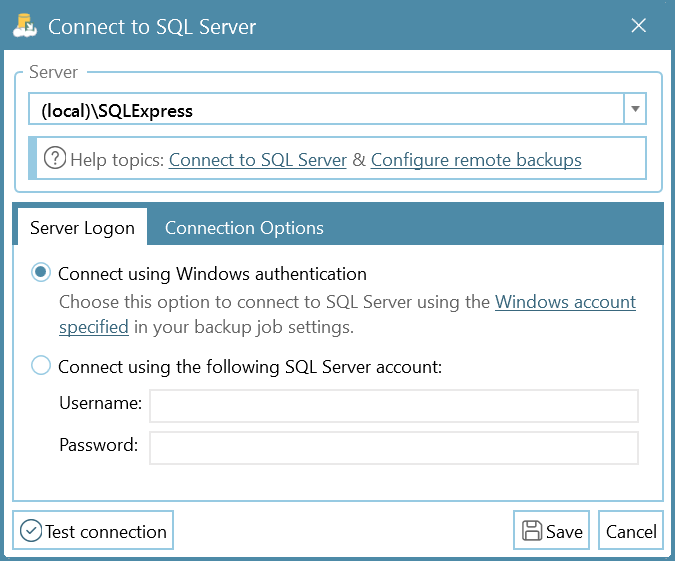
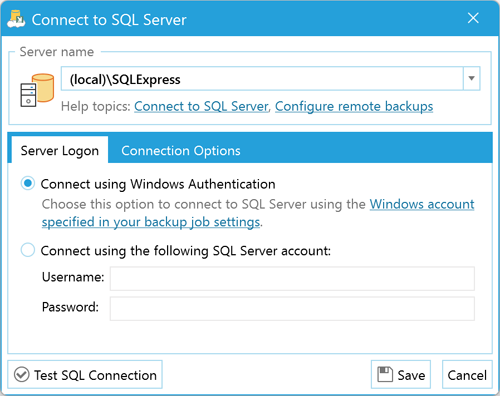
Navigate to the Backup and Restore window in SQL Backup Master and select New Backup. In the Database Backup Editor window that appears, click the Choose SQL Server button. The Connect to SQL Server window will then pop up.

In the field labeled Server name, enter the name of the SQL Server instance that you want to connect to, or use the drop-down arrow to select one. Common examples include:
- (local)\SQLExpress – Specifies the default SQL Express named instance on the local computer.
- (local) – Specifies the local SQL Server installation (without an instance name).
- Server1\SQLExpress – Specifies the default SQL Express named instance on a remote computer named “Server1.”
- Server1 – Specifies an unnamed SQL Server instance on a remote computer named “Server1.”
Click Test SQL Connection to verify your connection, then select OK.
STEP 3 – SELECT DATABASES TO BACK UP
Once you’ve connected to a SQL Server instance, the Database Backup Editor window will appear, displaying available databases in the Source column. Check the database(s) you want to include in this backup job.
Enabling Back up all non-system databases ensures that any newly created databases on the targeted SQL Server are automatically backed up going forward.
STEP 4 – ADD A BACKUP DESTINATION
Click the Add button under the Destinations header. This opens a window that lists all possible backup destinations for your SQL databases:

Double-click the option labeled OneDrive.
The OneDrive Destination Settings window appears. This is where you authorize SQL Backup Master to connect with your OneDrive. Click Authorize Now and input your Microsoft login details in the new window.
After signing in to your Microsoft account and verifying your details, you’ll be prompted to confirm SQL Backup Master’s access to OneDrive. Select Yes to continue.
You’ll then be shown a unique authentication code. Copy it (Ctrl + C), exit the browser, and return to SQL Backup Master. Paste the code into the Authorization Code window and click OK.
Use the Test button in the OneDrive Destination Settings window to confirm a successful connection, then select OK.
Finally, click the Save icon at the bottom-right of the Database Backup Editor window to finalize your backup destination.
STEP 5 – RUN THE BACKUP
In the main application window, select your newly created backup job and click Back up now to initiate your “backup SQL to OneDrive” process.
If the backup job doesn’t complete successfully, check the log file for more details on the issue.
That’s it! By backing up SQL databases to OneDrive, you’ll streamline data protection and offsite storage—ensuring quick recovery and peace of mind for your organization. For additional features—like backing up to Dropbox, Google Drive, or Amazon S3—explore the full suite of capabilities of SQL Backup Master from Key Metric Software.
Back Up SQL Databases to Backblaze
Looking for an easy way to back up SQL data to Backblaze? With SQL Backup Master and Backblaze B2 cloud storage, you can automate and secure your SQL Server backups in just a few steps. Follow the guide below to set up and run your backup job.
STEP 1 – Backblaze Account Setup
Go to the Backblaze B2 homepage and click the Sign Up button to create an account. You’ll only need to provide an email address and password to proceed. Once logged in, you’ll be ready to create storage buckets for your SQL backups.
STEP 2 – CONNECTING TO A SQL SERVER DATABASE
In SQL Backup Master, open the Backup and Restore window and select New Backup. When the Database Backup Editor window appears, click the Choose SQL Server tab to bring up the Connect to SQL Server window.

In the Server name field, type or select the name of the SQL Server instance you’re backing up. Examples include:
- (local)\SQLExpress – The default SQL Express named instance on the local computer.
- (local) – A local SQL Server installation (no instance name).
- Server1\SQLExpress – The default SQL Express named instance on a remote computer named “Server1.”
- Server1 – An unnamed SQL Server instance on a remote computer named “Server1.”
Use the drop-down arrow in the Server name field to automatically find local or remote SQL Server instances. Click Test SQL Connection to verify connectivity, then select OK.
STEP 3 – Select Databases to Back Up
After connecting, the Database Backup Editor window will list available databases under Source. Check the boxes for the databases you want to include in this backup job.
Enable Back up all non-system databases if you’d like new databases to be automatically added to future backups on this SQL Server.
STEP 4 – Add a Backblaze B2 Backup Destination
Click the Add icon under Destinations. A window listing possible backup destinations will appear:
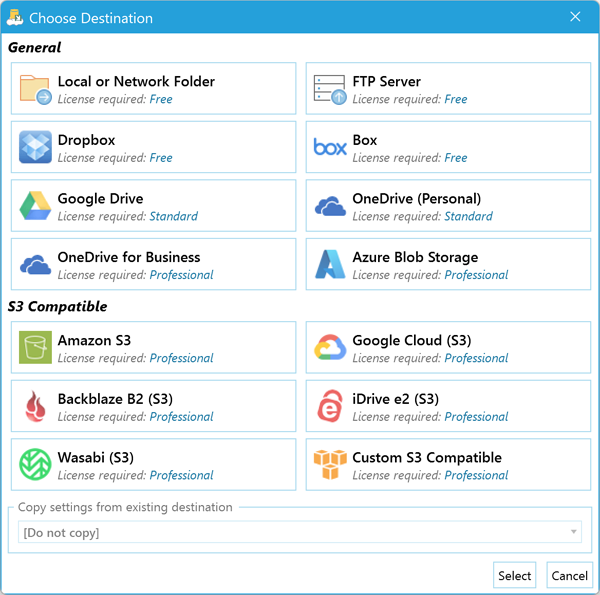
Double-click Backblaze B2. The Backblaze B2 Destination Settings window will appear, prompting you to authorize SQL Backup Master’s connection to your Backblaze account. Enter your Access Key, Secret Key, and choose your Bucket. Use the Test button to confirm a successful connection.
Back at the Database Backup Editor window, click the Save icon to finalize your backup destination.
STEP 5 – RUN THE BACKUP
In the main SQL Backup Master window, locate your newly created backup job and click Back up now to begin sending your SQL backups to Backblaze B2.
If the backup job doesn’t complete successfully, review the application log file for error details or additional troubleshooting information.
That’s it! You are now backing up your SQL database to Backblaze. By automating backups with SQL Backup Master, you’ll have peace of mind knowing your critical data is protected offsite and readily available for recovery.
If you’re looking for additional backup destinations—such as Dropbox, OneDrive, or Amazon S3—be sure to explore the full feature set of SQL Backup Master by Key Metric Software.
Back Up SQL Databases to Amazon S3
Need a streamlined way to back up SQL to Amazon S3? With SQL Backup Master, you can quickly automate backups and securely store your databases in Amazon’s cloud. Follow the steps below to configure your Amazon S3 account, connect to SQL Server, and create a reliable offsite backup solution.
STEP 1 – AMAZON S3 ACCOUNT CREATION AND SETUP
To create an Amazon S3 account, navigate to Amazon’s AWS home page and select Get Started with Amazon S3. Click the Create a new AWS account button below the login field, then follow the on-screen instructions to set up and verify your new AWS account.
STEP 2 – CONNECTING TO YOUR SQL SERVER
In SQL Backup Master, open the Backup and Restore tab and select New Backup. Within the Database Backup Editor window that appears, choose Choose SQL Server to bring up the Connect to SQL Server dialog:

Enter the name of the SQL Server instance you’re connecting to in the Server name field. Common examples include:
- (local)\SQLExpress – Specifies the default SQL Express named instance on the local computer.
- (local) – Specifies the local SQL Server installation (without an instance name).
- Server1\SQLExpress – Specifies the default SQL Express named instance on a remote computer named “Server1.”
- Server1 – Specifies an unnamed SQL Server instance on a remote computer named “Server1.”
You can also use the drop-down arrow in the Server name field to detect local and remote SQL Server instances. Click Test SQL Connection to verify connectivity, then select OK.
STEP 3 – SELECT DESIRED DATABASES TO BACK UP
Now that you’re connected, the Database Backup Editor window will display all available databases under Source. Check the boxes for the databases you wish to include in this backup job.
Alternatively, enable Back up all non-system databases to automatically include any new databases created on your SQL Server over time.
STEP 4 – CHOOSE S3 AS YOUR BACKUP DESTINATION
Under the Destinations header in the Database Backup Editor, click the Add button to specify where your backups will be stored. A new window will appear, listing compatible backup destinations:

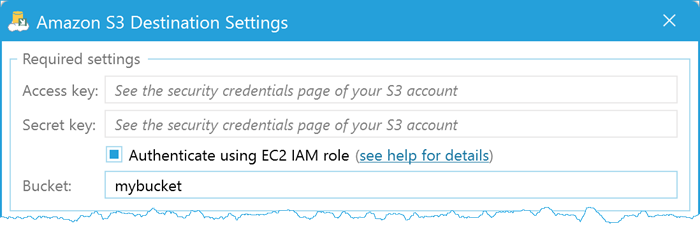
Double-click Amazon S3. The Amazon S3 Destination Settings window will then open. This is where you’ll configure your S3 credentials.
Retrieve your Access key and Secret key from the Security Credentials section of your AWS Management Console, and paste them into the corresponding fields in SQL Backup Master. Enter the name of your existing S3 Bucket in the third field. Once you’ve filled in the details, click Test to confirm a successful connection, and then select OK.
Back at the Database Backup Editor window, click the Save icon in the bottom-right corner to finalize your backup destination settings.
STEP 5 – RUN THE BACKUP
Return to the main SQL Backup Master window, select your newly created backup job, and click Back up now to begin sending your SQL Server databases to Amazon S3.
If the backup job doesn’t complete successfully, review the application log file for error details or additional troubleshooting information.
That’s it! You are now backing up your SQL database to Amazon S3. By automating backups with SQL Backup Master, you’ll have peace of mind knowing your critical data is protected offsite and readily available for recovery.
If you’re looking for additional backup destinations—such as Dropbox, OneDrive, or Google Drive—be sure to explore the full feature set of SQL Backup Master by Key Metric Software.
Back up SQL Databases to Google Drive
Looking for a straightforward way to backup SQL data to Google Drive? Utilizing Google Drive as a backup destination ensures your databases are stored safely offsite. Follow this quick guide to configure SQL Backup Master to automatically back up SQL databases to Google Drive.
STEP 1 – CREATE AND SET UP YOUR GOOGLE DRIVE ACCOUNT
Open the Google Drive homepage and sign up or log in using the account best suited for your organization’s needs. Follow any prompts and provide the requested information. Ensure you have adequate storage space to hold your SQL database backups.
STEP 2 – CONNECT TO SQL SERVER
Open SQL Backup Master and click on Backups in the navigation center, then select New Backup. The Database Backup Editor window will appear. Within this window, select the Choose SQL Server tab. The Connect to SQL Server window will then open.
In the field labeled Server Name, select or enter the name of the SQL Server instance that you are connecting to. Common examples include:
- (local)\SQLExpress – Default SQL Express named instance on the local machine.
- (local) – Local SQL Server installation without a named instance.
- Server1\SQLExpress – Default SQL Express named instance on a remote computer named “Server1.”
- Server1 – An unnamed SQL Server instance on a remote computer named “Server1.”
TIP: Use the drop-down arrow next to the Server Name field to discover local and remote SQL Server instances automatically.
Click Test SQL Connection to confirm your connection, then click OK. Next, click the Save button (bottom-left).
When the Windows user account configuration notice appears, click Yes to continue. Then, check Run Backup with a Specific Windows Account and enter your authentication credentials (typically only needed once per backup job).
STEP 3 – SELECT DESIRED DATABASES TO BACK UP
After connecting to a SQL Server instance, the Database Backup Editor window will list available databases under Source. Select all the databases you want to include in this backup job.
TIP: Enable Back up all Non-System Databases to automatically include newly created databases on the target server going forward.
STEP 4 – ADD A GOOGLE DRIVE BACKUP DESTINATION
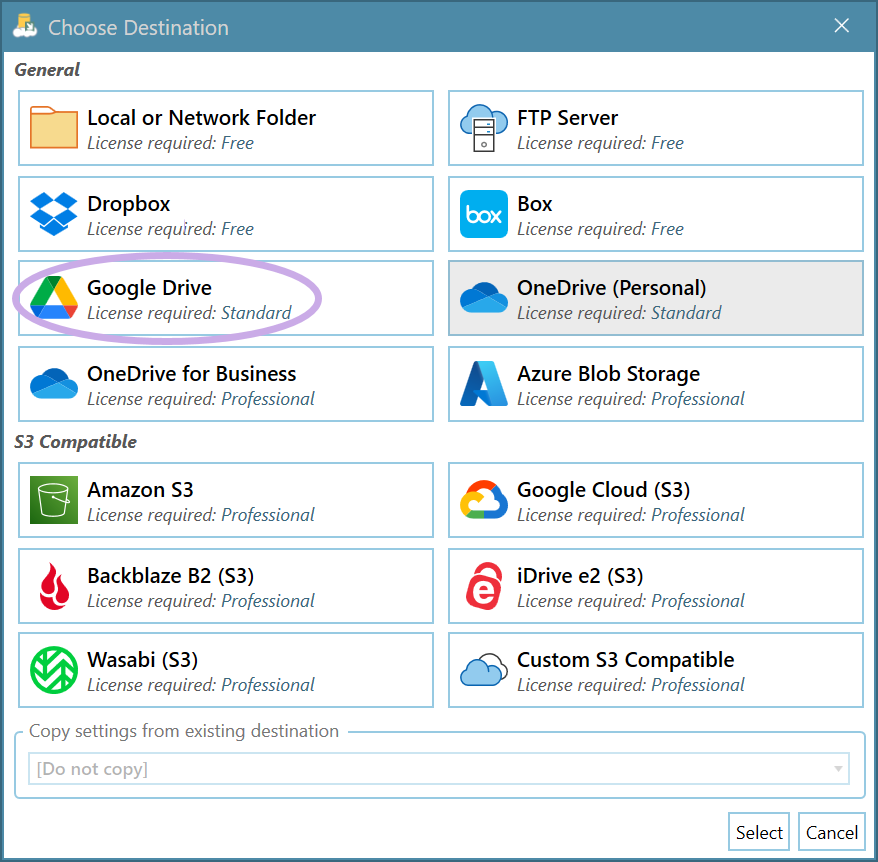
Under the Destinations header in the Database Backup Editor, click the Add button. A window will appear, listing all possible backup destinations supported by SQL Backup Master.
Double-click Google Drive (or select it and click Select) to choose it as your backup destination.
You will then see the Google Drive Destination Settings window, where you can authorize a connection to your Google Drive account.
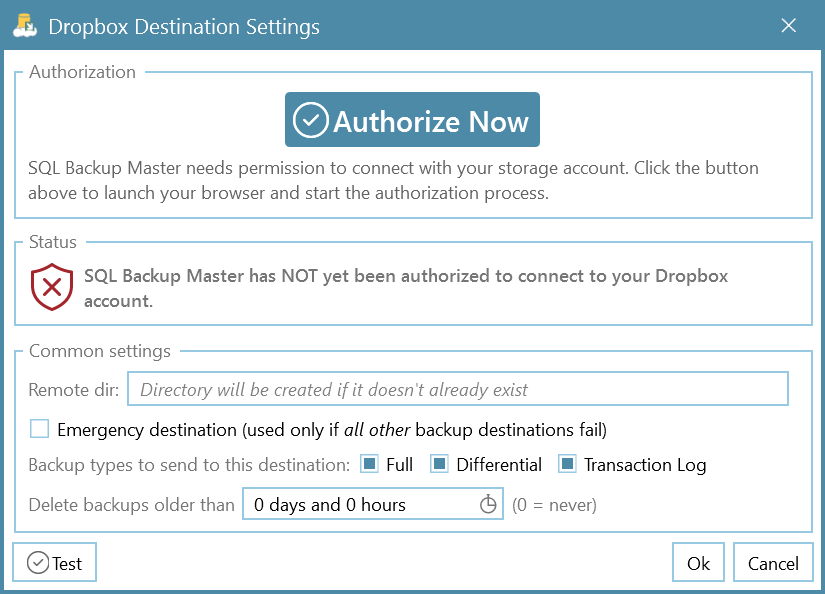
Select Authorize Now and sign in with your Google Drive credentials. Follow the prompts to grant SQL Backup Master permission to upload backup files to your Google Drive. You should see confirmation screens during the authorization process:
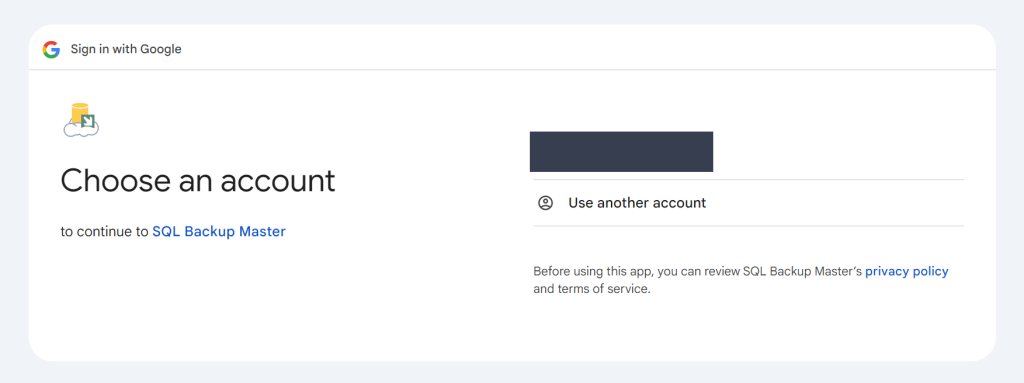
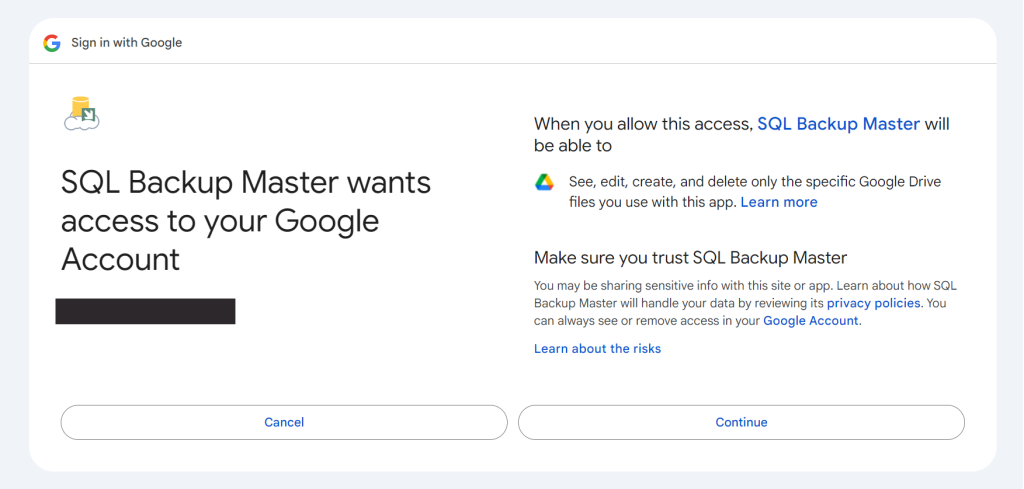
Click Continue when prompted. Once authorization is successful, you should see a confirmation screen similar to this:

STEP 5 – RUN THE BACKUP JOB
Return to the main window in SQL Backup Master, select your newly created backup job, and hit Back up now to begin backing up your databases to Dropbox. If the backup job does not complete successfully, consult the log file for more details on any errors.
If the backup job doesn’t complete successfully, review the application log file for error details or additional troubleshooting information.
That’s it! You are now backing up your SQL database to Google Drive. By automating backups with SQL Backup Master, you’ll have peace of mind knowing your critical data is protected offsite and readily available for recovery.
If you’re looking for additional backup destinations—such as Dropbox, OneDrive, or Amazon S3—be sure to explore the full feature set of SQL Backup Master by Key Metric Software.
STEP 1 – GOOGLE DRIVE ACCOUNT CREATION AND SETUP
To create a Google Drive account, navigate to the Google Drive home page and select the Sign up at no cost option near just under the Go to Drive button.
Next, enter your contact information and required credentials to create your account. Once your account is created, you will be taken to the Google Drive main page.
STEP 2 – CONNECT YOUR SQL SERVER
In SQL Backup Master, navigate to the Backup and Restore tab, here select the New Backup button. Then the Database Backup Editor window will open, select the tab labeled Choose SQL Server. This will bring up the Connect to SQL Server window:

In the Server name field, enter or select the name of the SQL Server instance that you are going to connect to. Common examples include:
- (local)\SQLExpress – Specifies the default SQL Express named instance on the local computer.
- (local) – Specifies the local SQL Server installation (without an instance name).
- Server1\SQLExpress – Specifies the default SQL Express names instance on a remote computer named “Server1”.
- Server1 – Specifies an unnamed SQL Server instance on a remote computer named “Server1”.
Use the Test SQL Connection button to test your connection, then hit Ok.
STEP 3 – SELECT DATABASES TO BACK UP
Once you’ve properly connected to a SQL Server instance, the Database Backup Editor window will display all available databases under the Source label. Select the database(s) you want to include in this backup job
Checking the box labeled Back up all non-system databases will back up all new databases created on the target SQL Server in the future automatically.
STEP 4 – ADD A BACKUP DESTINATION
Click the button labeled Add under the window header labeled Destinations. This will bring up a window displaying all compatible backup destinations for your SQL Database:

Choose Google Drive by double-clicking the Google Drive selection box.
After choosing Google Drive as your destination, the Google Drive Destination Settings window will appear. This is where you establish a connection to Google Drive. Click on the Authorize Now button and input your Google login information on the new window.
Signing in to your Google account through the browser will bring up the following window:

Select the Allow option then close the window to continue.
You can use the Test button in the bottom left corner of the Google Drive Destination Settings window to verify that you have a successful connection to your desired Google account, select Ok, then click the Ok button on the main window to continue.
Back at the bottom right corner of the Database Backup Editor window, use the Save button to establish your backup destination.
STEP 5 – RUN THE BACKUP JOB
Back in the main window of the application, select your newly created backup job and use the Back up now button to begin backing up your SQL Server to your Google Drive.
If the backup job does not complete successfully, please review the log file for further details on the failure.
Back Up SQL Databases to Box
Looking for an easy way to back up SQL to Box? By using SQL Backup Master, you can automate backups of your SQL Server databases and securely store them in Box’s cloud environment. Follow the steps below to configure your Box account, connect to SQL Server, and safeguard your critical data offsite.
STEP 1 – BOX ACCOUNT CREATION AND SETUP
On the home page of Box, select the Get Started tab from the top banner and choose the plan that best meets your needs. Provide the requested personal or business information to finalize your account.
STEP 2 – CONNECT TO SQL SERVER
In SQL Backup Master, open the Backup and Restore window and select New Backup. In the Database Backup Editor window that appears, click the Choose SQL Server tab. This will bring up the Connect to SQL Server window.

In the Server name field, enter the name of the SQL Server instance that you want to back up. Common examples include:
- (local)\SQLExpress – Default SQL Express named instance on the local computer.
- (local) – A local SQL Server installation without an instance name.
- Server1\SQLExpress – A default SQL Express named instance on a remote computer named “Server1.”
- Server1 – An unnamed SQL Server instance on a remote computer named “Server1.”
TIP: Use the drop-down arrow next to Server name to discover local or remote SQL Server instances automatically. Once selected, click Test SQL Connection to verify connectivity, then hit OK.
STEP 3 – SELECT DESIRED DATABASES TO BACK UP
After a successful connection, the Database Backup Editor window will list available databases under Source. Choose which databases you want to include in the backup job.
TIP: Enable Back up all non-system databases to automatically capture any new databases created on the target SQL Server going forward.
STEP 4 – ADD A BOX BACKUP DESTINATION
Under the Destinations header in the Database Backup Editor, click the Add icon. This will bring up a window listing all possible SQL backup destinations:

Double-click Box to select it as your destination. The Box Destination Settings window will then appear, prompting you to authorize SQL Backup Master to access your Box account. Click Authorize Now and sign into your Box account in the new browser window.
You’ll receive a unique authentication code. Copy it (Ctrl+C), exit the browser window, and paste (Ctrl+V) this code into the Authorization Code field in SQL Backup Master. Select OK.
TIP: Use the Test button in the bottom-left corner of Box Destination Settings to confirm a successful connection. Click OK to finalize, and then again on the main window to continue.
Finally, click the Save icon at the bottom-right of the Database Backup Editor window to establish Box as your backup destination.
STEP 5 – RUN THE BACKUP JOB
In the main window of SQL Backup Master, locate your newly created backup job and click Back up now to start sending your SQL databases to Box. If any errors occur, consult the log file for more details.
If the backup job doesn’t complete successfully, review the application log file for error details or additional troubleshooting information.
That’s it! You are now backing up your SQL database to Box. By automating backups with SQL Backup Master, you’ll have peace of mind knowing your critical data is protected offsite and readily available for recovery.
If you’re looking for additional backup destinations—such as Dropbox, OneDrive, or Amazon S3—be sure to explore the full feature set of SQL Backup Master by Key Metric Software.
Back up SQL Databases to Google Cloud Storage
Need an efficient way to back up SQL to Google Cloud Storage? With SQL Backup Master, you can quickly configure, automate, and maintain secure offsite backups for your SQL Server databases. Follow the steps below to set up Google Cloud Storage (GCS) as your backup destination.
STEP 1 – GOOGLE CLOUD STORAGE ACCOUNT SETUP
Start by navigating to the Google Cloud Storage homepage and selecting either Get started for free or Try Storage free. You’ll be asked to provide company credentials and a phone number as part of Google’s verification process.
STEP 2 – CONNECT SQL SERVER DATABASE
In the Backup and Restore window of SQL Backup Master, click New Backup. The Database Backup Editor window will appear. Select Choose SQL Server to open the Connect to SQL Server dialog.
In the Server name field, enter or select the name of your SQL Server instance. Common examples include:
- (local)\SQLExpress – The default SQL Express named instance on the local computer.
- (local) – A local SQL Server installation without an instance name.
- Server1\SQLExpress – The default SQL Express named instance on a remote computer named “Server1.”
- Server1 – An unnamed SQL Server instance on a remote computer named “Server1.”
Click the Test SQL Connection button to confirm connectivity; then select OK.
STEP 3 – SELECT DESIRED DATABASES TO BACK UP
After connecting, the Database Backup Editor window will list your available databases under Source. Check the databases you want to back up as part of this job.
TIP: Enable Back up all non-system databases to automatically include any newly created databases on the target SQL Server in subsequent backups.
STEP 4 – ADDING A BACKUP DESTINATION
Under the Destinations header, click the Add icon. A window will appear, displaying compatible backup destinations supported by SQL Backup Master:

Double-click Google Cloud Storage to select it as your backup destination. The Google Cloud Storage Destination Settings window will appear, prompting you to enter your Access key, Secret key, and Bucket. You can generate these keys from your Google Cloud project credentials.
Click the Test button to verify that SQL Backup Master can connect to your GCS bucket. Select OK, then confirm once more on the main window to continue. Finally, click the Save icon at the bottom-right of the Database Backup Editor to finalize your backup destination.
STEP 5 – RUN THE BACKUP
Return to the main SQL Backup Master window, locate your new backup job, and click Back up now to begin sending your SQL Server databases to Google Cloud Storage. If the backup job fails, consult the log file for more detailed information on any errors.
That’s it! You can now safeguard your SQL Server data offsite by leveraging the reliability of Google Cloud Storage—powered by SQL Backup Master from Key Metric Software.