SQL Backup Master Version 8.1 Now Available
Though a minor version update, SQL Backup Master v8.1 introduces several important—and frequently requested—features. Let’s dive in!
First, you can now run database integrity checks before each backup. This option is available in the Database Options tab of the backup job settings window. When enabled, it executes DBCC CHECKDB for each database in the backup job. If an integrity check fails, errors are logged and you can optionally halt the backup job.
We’ve also updated the batch database restore feature to let you specify a restore directory, giving you control over where the restored database files will reside.
The Tools area of the client UI now includes an option to launch PowerShell with the Cmdlet module loaded and ready to use. See our SQL Backup Master PowerShell Cmdlets article for details.
Finally, we’ve improved the performance of Dropbox and Azure Blob Storage uploads.
For a full review of what’s new in v8.1, see the product release notes.
SQL Backup Master v8.0
SQL Backup Master v8 includes new security improvements and critical updates for cloud storage service providers. This, along with a wealth of new features, makes this one of the most important updates we’ve ever released.
New Features
Let’s look at some of the new features first:
- SQL Server 2025 support
- Languages: English, French, Italian, German, Spanish and Polish
- Direct Gmail and MS65 email integration support (OAuth)
- Support for WebDAV backup destinations
- Batch database restore capability
- Missed backup detection and recovery
- New “warning” backup job completion status
- New Powershell cmdlets
- Much more
We’ve also modernized the user interface, leveraging Microsoft’s fluent design aesthetic to create an experience that’s clearer and more consistent across supported Windows platforms. It offers both light and dark themes with your choice of accent color.
Security
Just as importantly, SQL Backup Master 8 includes several important security improvements.
- Improved, multi-layered OAuth token encryption at rest
- Installation now includes SBOM (software bill of materials)
- OAuth based email support (no password is stored)
- Major upgrades to backup destination SDKs
- Support for sensitive data removal during uninstall
- Support for upcoming Dropbox API server certificate changes
Download the new release now, or check out the full release notes for additional details.
TDE and SQL Server Database Backups
Transparent Data Encryption (TDE) is a fantastic feature in SQL Server. It provides powerful, at-rest encryption for your entire database, helping you meet security and compliance requirements with minimal effort. It truly lives up to its name – it’s transparent to your applications, encrypting and decrypting data on the fly.
But there’s a catch.
While TDE is transparent to your applications, its impact on your backup and disaster recovery strategy is anything but. If you’re using TDE without understanding how it interacts with your backups, you might be in for a nasty surprise when you actually need to restore one.
How TDE Really Affects Your Backup File
The most important thing to understand is this: when you back up a TDE-enabled database, the resulting backup file is also fully encrypted.
This is where people get into trouble. They assume their backup tool, like SQL Backup Master, can create and store backup files and that’s the end of the story. The backup is then diligently sent to the cloud or another secure destination. The problem arises when they try to restore that backup onto a different SQL Server instance—for example, during a disaster recovery test or a server migration.
The restore will fail. Every time.
Why? Because the encryption key needed to unlock the database isn’t in the backup file itself. It’s protected by a server certificate stored in the master database of the original SQL Server instance. Without that certificate, your new server has no way to decrypt the backup, rendering it useless.
The Missing Piece: Your Server Certificate
To successfully restore a TDE-encrypted backup on any server other than the one that created it, you need two things:
- The database backup file.
- A backup of the server certificate and its private key.
Backing up the certificate is a quick, one-time manual step you must perform on your SQL Server. It is absolutely critical.
To back up your certificate, run the following T-SQL command. Be sure to use a strong password and store the resulting files in a secure location, just like you would with any other sensitive credentials.
-- Replace 'MyTDECertificate' with the actual name of your certificate
BACKUP CERTIFICATE MyTDECertificate
TO FILE = 'C:\Temp\MyTDECertificate.cer'
WITH PRIVATE KEY (
    FILE = 'C:\Temp\MyTDECertificate_PrivateKey.pvk',
    ENCRYPTION BY PASSWORD = 'Your-Super-Secret-Password-Here!'
);
The Correct Restore Process
Once you have your database backup and your two certificate files (.cer and .pvk), the restore process on a new server becomes a simple two-step dance:
Step 1: Restore the Certificate
Before you do anything else, you must restore the certificate to the master database on the new server instance.
-- Run this on the NEW server
CREATE CERTIFICATE MyTDECertificate
FROM FILE = 'C:\Temp\MyTDECertificate.cer'
WITH PRIVATE KEY (
    FILE = 'C:\Temp\MyTDECertificate_PrivateKey.pvk',
    DECRYPTION BY PASSWORD = 'Your-Super-Secret-Password-Here!'
);
Step 2: Restore the Database
With the certificate in place, you can now restore your database using your standard procedure or through the SQL Backup Master app. The server will use the newly restored certificate to decrypt the backup, and the process will succeed.
Our Commitment
At SQL Backup Master, our goal is to provide the most reliable and straightforward backup solution possible. While the management of TDE certificates is a manual SQL Server process, we believe in empowering our users with the knowledge they need to build a rock-solid disaster recovery plan.
TDE is an excellent security tool, but a backup you can’t restore isn’t a backup at all. Take a moment today to ensure you have the certificate backups for all your TDE-enabled databases. Your future self will thank you.
Database Backup Command Line Interface
SQL Backup Master is a powerful tool for managing your database backups. While the graphical user interface is intuitive for setting up and running backup jobs, the command-line interface (CLI) offers a streamlined way to automate and integrate your backup processes. This is especially useful when you need to back up a specific database within a larger, more complex backup job on demand.
In this post, we’ll show you how to use the SQL Backup Master CLI to target a specific database for backup and how to create a simple batch file to execute the process with a double-click.
Using the Command Line
The SQL Backup Master command-line interface allows you to execute backup jobs with specific parameters. The key to backing up a single database is to use the /jobName argument to specify the backup job, and the /databaseNames argument to target the specific database(s) you want to back up.
The basic syntax is as follows:
SqlBackupMaster.exe /jobName “Your Backup Job Name” /databaseNames “YourDatabaseName“
For this to work, you will need to open a command prompt, navigate to the SQL Backup Master installation directory, and then execute the command. Remember to replace “Your Backup Job Name” with the name of your backup job and “YourDatabaseName” with the name of the database you wish to back up.
Creating a Simple Batch File
For even greater convenience, you can create a batch (.bat) file to trigger the backup. This allows you to run the backup job without needing to open the command prompt and type the command each time.
Here’s how to create a simple batch file:
- Open a text editor like Notepad.
- Enter the command to execute the backup. You will need to provide the full path to the SqlBackupMaster.exe executable.
- Save the file with a .bat extension. For example, you could name it Backup_Sales_DB.bat.
- To run the backup, simply double-click the .bat file you just created. A command prompt window will appear and execute the backup job according to the parameters you specified.
Conclusion
By leveraging the SQL Backup Master command-line interface and simple batch files, you can create a flexible and powerful backup strategy. This approach is perfect for situations where you need to perform ad-hoc backups of specific databases without running an entire backup job, saving you time and resources.
OneDrive for Business
Looking to back up SQL Server databases to OneDrive for Business? With SQL Backup Master, you can easily set up offsite storage and ensure a quick recovery strategy for your critical data. Follow the steps below to configure and run your backup job.
STEP 1 – ONEDRIVE FOR BUSINESS ACCOUNT CREATION
To create a OneDrive for Business account, navigate to the OneDrive for Business homepage. Then click the Download OneDrive for Business button and sign in with your Microsoft credentials. Once logged in, follow any prompts to finalize your setup.
STEP 2 – CONNECT TO YOUR SQL SERVER
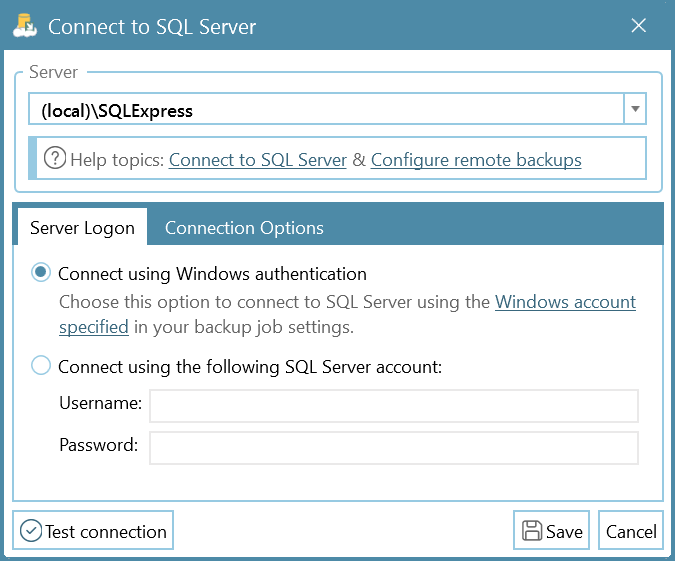
Within SQL Backup Master, open the Backup and Restore window and click New Backup. In the Database Backup Editor window that appears, click the Choose SQL Server button. This will bring up the Connect to SQL Server window.

In the Server name field, type or select the name of your SQL Server instance. Common examples include:
- (local)\SQLExpress – The default SQL Express named instance on the local computer.
- (local) – A local SQL Server installation without an instance name.
- Server1\SQLExpress – A default SQL Express named instance on a remote computer named “Server1.”
- Server1 – An unnamed SQL Server instance on a remote computer named “Server1.”
Click Test SQL Connection to verify connectivity, then select OK.
STEP 3 – SELECT DATABASES TO BACK UP
After connecting, the Database Backup Editor window will display available databases in the Source column. Choose the databases you want to back up as part of this job.
TIP: Enable Back up all non-system databases if you want newly created databases on the target SQL Server to be automatically included in future backups.
STEP 4 – ADD A BACKUP DESTINATION
Click Add under the Destinations header in the Database Backup Editor window. This will bring up a list of supported backup destinations:

Double-click OneDrive for Business to select it. The OneDrive for Business Destination Settings window will appear, allowing you to authorize SQL Backup Master to connect to your OneDrive for Business account.
Click Authorize Now and sign into your Microsoft account in the new browser window. After confirming, you’ll see a prompt asking you to Allow SQL Backup Master access.

Upon clicking Allow, you’ll be presented with a unique authorization code. Copy (Ctrl + C) this code, exit the browser, then paste (Ctrl + V) it into the Authorization Code window in SQL Backup Master. Click OK to finalize.

Use the Test button to ensure SQL Backup Master can successfully connect to OneDrive for Business. Click OK to save your settings, then Save again in the Database Backup Editor to confirm your new backup destination.
STEP 5 – RUN THE BACKUP
In the main SQL Backup Master window, select your newly created backup job and click Back up now to begin sending your SQL databases to OneDrive for Business. If the backup fails to complete, check the log file for more information.
That’s it! You can now store your SQL Server backups offsite with OneDrive for Business, ensuring increased security and a streamlined disaster recovery process.
Managed Service Account (MSA) Support
SQL Backup Master v7.9 is now available, and provides support for running backup jobs using a Windows Managed Service Account (MSA).
Please see our new MSA configuration guidance for details.
Back up SQL Databases to Dropbox
Need a straightforward way to backup your SQL data to Dropbox? By combining SQL Backup Master with the cloud storage capabilities of Dropbox, you can easily automate backups and protect your databases. Follow the steps below to set it up quickly and securely.
STEP 1 – CREATE AND SET UP YOUR DROPBOX ACCOUNT
On the homepage of Dropbox.com, select the Sign Up tab from the banner at the top of the website. Enter your credentials, click Create an Account, then choose the Dropbox plan that best fits your storage and budget needs.
Dropbox will ask a few questions to personalize your experience, then take you to the Download page. Select Download Dropbox to begin the application’s installation process.
STEP 2 – CONNECT TO SQL SERVER
Open SQL Backup Master and click on Backups in the navigation center, then click the New Backup button. The Database Backup Editor window will appear. Within this window, select the Choose SQL Server tab, which will open the Connect to SQL Server window.
In the field labeled Server Name, select or enter the name of the SQL Server instance you are connecting to. Common examples include:
- (local)\SQLExpress – Specifies the default SQL Express named instance on the local computer.
- (local) – Specifies the local SQL Server installation without an instance name.
- Server1\SQLExpress – Specifies the default SQL Express named instance on a remote computer named “Server1.”
- Server1 – Specifies an unnamed SQL Server instance on a remote computer named “Server1.”
TIP: Another way to locate local and remote SQL Server instances is by using the drop-down arrow in the Server Name field.
Click the Test SQL Connection button to confirm your connection, then hit OK. Click the Save button in the bottom-left of the window.
A window labeled Windows user account configuration notice will appear. Click Yes to proceed.
Check the box marked Run Backup with a Specific Windows Account and then enter your authentication credentials (you should generally only need to enter this information once per backup).
STEP 3 – SELECT DESIRED DATABASES TO BACK UP
After connecting to a SQL Server instance, the Database Backup Editor window will list available databases in the left-most column, labeled Source. Select the databases you want to back up as part of this job.
TIP: You can also check the box labeled Back up all Non-System Databases, enabling the automatic backup of all new databases created on the target SQL server in the future.
STEP 4: ADD A DROPBOX BACKUP DESTINATION
Select the Add button under the window header labeled Destinations. This will bring up a window displaying all possible backup destinations for your SQL database:

Double-click the selection box labeled Dropbox (or click once, then press the Select button) to choose Dropbox as your backup destination.
The Dropbox Destination Settings window will appear. This is where you will authorize a connection to Dropbox.
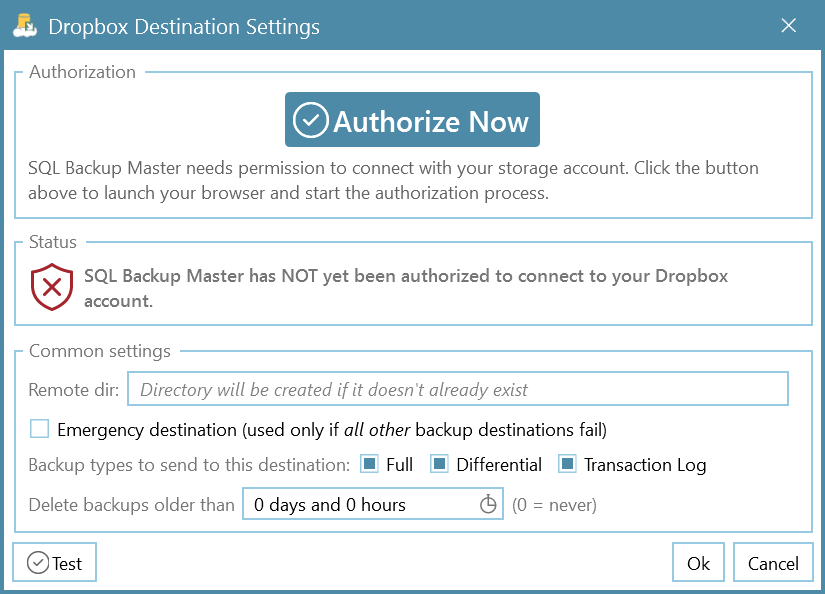
Press the Authorize Now button and then input your account information on the Dropbox login page. Signing in through the browser will bring up this window:
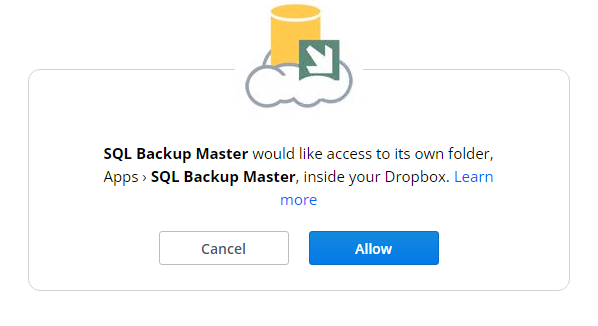
Click Allow, then you will be redirected to the SQL Backup Master App Verification page, where an authorization code will be displayed.

Press the Copy button to copy this authorization code to your clipboard. Back in SQL Backup Master, you will be prompted to paste the authorization code into the Authorization Code window.
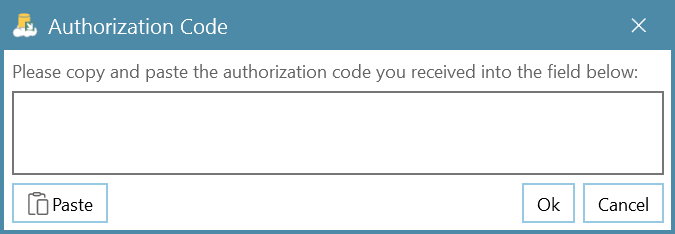
Once you’ve pasted in the code, click OK to complete the authorization. Use the Test button in the bottom-left corner of the Dropbox Destination Settings window to confirm a successful connection, then select OK. Finally, click OK in the main window to continue.
Back at the bottom-right corner of the Database Backup Editor window, click on the Save icon to finalize your Dropbox backup destination.
STEP 5 – RUN THE BACKUP JOB
Return to the main window in SQL Backup Master, select your newly created backup job, and hit Back up now to begin backing up your databases to Dropbox. If the backup job does not complete successfully, consult the log file for more details on any errors.
If the backup job doesn’t complete successfully, review the application log file for error details or additional troubleshooting information.
That’s it! You are now backing up your SQL database to Dropbox. By automating backups with SQL Backup Master, you’ll have peace of mind knowing your critical data is protected offsite and readily available for recovery.
If you’re looking for additional backup destinations—such as Google Drive, OneDrive, or Amazon S3—be sure to explore the full feature set of SQL Backup Master by Key Metric Software.
Google Drive Integration Update
Due to security changes at Google, SQL Backup Master’s integration with Google Drive has been updated to use a narrower authorization scope. After this change, SQL Backup Master will only have access to files and folders that it created.
SQL Backup Master users that are sending backups to Google Drive must upgrade to SQL Backup Master v7.3 and re-authorize any existing Google Drive connections. Integrations that are not re-authorized will stop working on July 31st, 2024.
How To Proceed
- Upgrade to SQL Backup Master v7.3. If you’re using a previous major version release, you’ll need to upgrade your license prior to upgrading the product installation.
- Start SQL Backup Master and identify backup jobs that connect with Google Drive.
- Re-authorize each Google Drive connection by editing them and clicking the Authorize button.
- Save the backup job.
Once done, test all affected backup jobs to ensure expected functionality.
Additional Considerations
SQL Backup Master 7.3 should continue to prune, recover, and otherwise process backup files created with previous product versions.
However, SQL Backup Master 7.3 will no longer have access to shared Google Drive files or folders. As such, we recommend you don’t use Google Drive’s sharing features when storing database backups.
Also, if you store SQL Server backups in Google Drive folders that were not created by SQL Backup Master, then SQL Backup Master 7.3 will no longer have access to them.
SQL Backup Master 7 is Released
Key Metric Software is proud to announce the release of SQL Backup Master 7 – a new, major version of our award-winning SQL Server backup and recovery software.
This version includes a user interface overhaul, a powerful new dashboard view, greatly improved 7-zip compression support, and much more. See the what’s new page for details.
SQL Backup Master 7 is available for immediate download.
“Invalid backup chain detected” Troubleshooting
SQL Backup Master 6.3 includes a new feature called backup chain validation that is responsible for generating “invalid backup chain detected” messages. This article describes the goal and function of this feature.
Introduction
The goal of backup chain validation is to warn users when other third-party applications could potentially interfere with the SQL Server backup chain. Specifically, when a differential or transaction log backup is started, SQL Backup Master analyzes SQL Server’s backup history table and checks to see if the most recent backup was also created by SQL Backup Master.
If a possible conflict is detected, SQL Backup Master writes an “invalid backup chain detected” message to the log. Such messages can be logged as warnings (default) or errors, depending on backup job settings.
Note that copy-only database backups are ignored during backup chain validation, as they don’t interfere with the SQL Server backup chain. See below for details.
Why does it matter?
Why is it a potential problem if another software tool is also taking SQL Server backups?
In some cases, it won’t be. If a third-party software tool is taking copy-only SQL Server backups, those will not interfere with the backup chain so SQL Backup Master won’t warn about them. If you need to occasionally take a backup outside of SQL Backup Master (i.e. via SQL Server Management Studio, etc.) then creating a copy-only backup is a good option.
However, some third-party products will create snapshot backups (via Volume Shadow Copy Service) that will invalidate the backup chain. A broken backup chain can then trigger other backup errors or interfere with future restore efforts.
Troubleshooting
SQL Backup Master makes it easy to see if another software tool is taking snapshot database backups.
To start, select the Reporting tab in the main product window and select the Backup history report. Starting at around the time when SQL Backup Master logged the “invalid backup chain detected” message, look for preceding report entries with the Is Snapshot field set to True.
You can also look for report entries with a Backup set field that is not set to “SQL Backup Master backup”.
Solutions
If you’ve used the information above to determine that snapshot database backups are triggering this message, there are several possible solutions.
One option is to disable the SQL Writer system service, which VSS (Volume Shadow Copy Service) uses to create SQL Server database snapshots. To do so, Run services.msc, find the SQL Server VSS Writer service, stop it, and configure it to start up manually.
Another possible option is to determine which third-party backup solution is taking SQL Server database snapshots and configure it not to do so. For example, if you’re using Azure Backup you may wish to avoid using the SQL Server backup agent. Other Virtual Machine or cloud-based solutions may have backup features that can be similarly configured.
Finally, if you determine that the “invalid backup chain detected” messages logged by SQL Backup Master are not relevant for your environment, you can ignore them (if they’re configuring as warnings) or disable them entirely in the Database tab of the backup job settings window.
Once the problem is resolved, we recommend taking a manual full backup of any affected databases in SQL Backup Master to reset the backup chain.